NUE-PSK Digital Modem
CW Mode Support
![]()
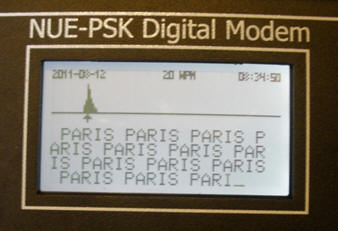
"CW Reader" and "Morse Keyboard" functions
enable the modem to decode and transmit CW on your SSB or
CW transceiver!
|
|
NUE-PSK Digital Modem CW Mode Support
"CW Reader" and "Morse Keyboard" functions
|
|
| Overview | Requirements | Setup | CW Receive | CW Transmit | CW Direct Mode |
Version 4 software gives your modem the latest feature: CW Mode ... which is a combined "CW reader and Morse Keyboard" capability! Just set the Mode to CW, dial over to a signal of interest on the modem's bandscope, and if it is CW you will see a darned good quality text display of that Morse code signal. The speed of the CW signal being decoded is displayed on the modem's LCD. Then when you go into transmit (press F10 and start typing) your text will be sent over to the SSB rig and transmitted as Morse code! You can set the transmit speed from 1-50 wpm! See the slide deck we presented at the TAPR Digital Communications Conference on Sept 16, 2011.
New ...
Additionally, in version 5 software we added CW Direct Mode, which
allows you to connect your modem directly to a CW rig for digital mode (CW) QSOs.
So, while v4 software added transmitting in CW mode as a tone, which of
course can only be used with an SSB transceiver, v5 allows you to connect the
modem's PTT line to the transceiver's Key In line (or PTT). Pretty
nifty, eh? See the photos below showing active QSOs in-progress using the
modem with the ATS-3 and KX-1 CW-only transceivers. The look down to the
CW Direct section on this page for mode details.
_a.jpg)
_2(800).jpg)
CW Direct Mode being used CW Direct Mode being used
with the KD1JV "ATS-3B" CW Transceiver
with the Elecraft "KX1" CW Transceiver
(Click photos to see larger view)
Many thanks to developer Dave Collins, AD7JT for developing CW Mode support for everyone to enjoy! Dave is an engineer extraordinaire and a good friend. Be sure to say hi to Dave when he pops onto the list to help us all out with use of the new CW Mode!
Version 4 software gives your modem the latest feature: CW Mode ... which is a combined "CW reader and Morse Keyboard" capability. Just set the Mode to CW, dial over to a signal of interest on the modem's bandscope, and if it is CW you will see the Morse code signal decoded to text in the modem's display, with the speed of the CW signal displayed along the top of the display. Then when you go into transmit (press F10 and start typing) your text will be converted to Morse coded audio tones that your SSB transceiver transmit as Morse code. You can set the transmit speed to be from 1-50 wpm, set sidetone frequency, threshold levels (defining mark and spaces), bandwidth of the decoding window, and more.


·
NUE-PSK Digital Modem with firmware version 4.00 or higher
installed.
Single-Side-Band transceiver operating in SSB USB or in
DIGITAL modes – or use CW Digital Mode on the modem to use with your CW rig!
Reasonably strong CW signal preferably keyed by a PC or a good
quality keyer.
Connect the audio interface of the modem to the appropriate connector(s) on the transceiver.
Turn on the modem and press F10 to enable TX mode. (The transceiver should be off.) Use the configuration menu to select CW mode, and press F10 to turn on TX mode. Use the tuning dial to select the WPM speed you want to transmit at, and press Esc to turn on the side tone if it is not already on. Hold Ctrl down while rotating the tuning dial to select the desired side tone frequency. The tone can be tested by keying a character followed by a space. There is no volume control. The Esc key can be used to toggle the transmit side tone on and off. Press F10 to enable RX mode.
If desired, use the configuration menu to save the settings to EEPROM.
Turn on the transceiver and tune to the CW portion of the desired band.
Receive Operation:
Tune the transceiver until a good CW signal is heard and observed on the modem spectrum display near the cursor. Tune the modem by turning the tuning knob or pressing the arrow keys to center the cursor on the highest bar in the spectrum display. If you get it within a couple bars, the AFC logic will fine tune the cursor for you. You can activate a fine tune (acquire) by pressing the End key. The AFC logic will seek to the highest bar within two bars of the present location.
If the signal is strong enough and clear enough and the transmitting operator presents a fairly good “fist”, the CW receive channel should sync in fairly rapidly and start displaying the received characters. If characters are not displayed, press ‘T’ to bring up the Goertzel filter MARK-SPACE threshold fence setting. If you can clearly hear the CW signal but the modem cannot, the threshold may be set too high or too low. If the displayed setting is high in the allowed range, use the ‘-‘ key to lower it. Continue to lower it until characters start to appear on the display. This indicates the fence is between the MARK and SPACE levels. Press Enter to clear the display and allow the firmware to take control of the threshold level. Similarly, if the threshold seems too low (not a common occurrence), use the ‘+’ key to raise it until characters start to appear on the display. It is best to not keep the threshold locked. This prevents the firmware from following varying band conditions (QSB).
If displayed characters have extra spaces between them, the code may be being sent in Farnsworth mode where the characters are sent at one speed and the inter-character spaces are extended. Sometimes operators send in this manner when band conditions are bad because it can be easier to copy. If this is the case, press the ‘W’ key to bring up the Word multiple display. This is the time threshold used to identify the end of a character. The fence time can be extended, one tenth of a Tcw at a time, by pressing the ‘+’ key. Repeatedly press the ‘+’ key until the character spacing looks normal. Similarly, if words appear to be run together, the Word multiple can be reduced by pressing the ‘-‘ key. Once this setting is changed, it will remain locked at that value until the Enter key is pressed then it will revert to the settings computed by the firmware.
If characters are broken up into “sub characters” (e.g., all dots appear as ‘E’ and all dashes appear as ‘T’, the inter character spacing may be too short. This is rare but can happen at very low speeds. The inter-character spacing fence can be adjusted by pressing the ‘C’ key and using the ‘+’ and ‘-’ keys to lengthen of shorten the fence.
If the band is crowded and you are bothered by QRM (or even QRN) filters may be used to adjust the receiving bandwidth. The transceiver’s built in filters can be used but this will limit the bandwidth displayed on the modem’s spectrum display and make it harder to tune. The modem’s bandwidth can be adjusted by pressing the ‘B’ key and using the ‘+’ and ‘-’ keys to step through the available options. Doing the filtering at the modem has the advantage of keeping the passband centered on the cursor position. Adjusting the transceiver’s filters may move the passband far enough to require retuning to get the cursor centered again. Some transceivers have a control to shift the filter range with respect to the dial frequency which helps but it can still be hard to tell when the transceiver’s pass band is centered on the cursor. The band width display is cleared by pressing the Enter key but the selected band width remains in effect.
When the band width is set too narrow, it make it harder for the firmware to decode faster CW transmissions. This will be apparent by observing the WPM displayed on the top line of the LCD display. When this condition is present, the displayed WPM value will vary over 5 to 10, or more, WPM and there will probably be more errors in the decoding.
In RX mode, pressing the Esc key will toggle the receive side tone generator on and off. The side tone frequency is the same for both receive and transmit side tones and can only be changed while in TX mode.
Four special displays are available as operator aids while in RX mode. The first is My Call which is activated by pressing Ctrl-M. This displays the current call stored in the EEPROM and allows editing (backspace) or clearing (Home) of the current value. My Call is stored directly into and recalled from the EEPROM.
The second is Their Call which is activated by pressing Ctrl-T. The value shown may be edited or cleared in the same manner as My Call. Their call is stored in volatile RAM and will not be saved and restored when power is cycled.
The third is Serial Number which is activated by pressing ‘S’. The serial number can be incremented by pressing ‘+’ and decremented by pressing ‘-‘. The serial number value is entered directly into EEPROM and will persist through power cycling.
The fourth is a combination of Serial Number and Their Call and is activated by pressing ‘X’. The serial number value can be change with the ‘+’ and ‘-‘ keys but the Home key will not reset it. Their Call can be cleared by the Home key and entered or edited from the keyboard.
All four of these special displays are cleared and the entered value(s) saved when the Enter key is pressed. If the modem is toggled to TX mode while one of these displays is shown, the current state will be preserved and the display will be restored the next time the modem goes into RX mode. Note that the entered values are effective immediately, it is not necessary to press Enter to activate them.
Transmit Operation:
The F10 key toggles the firmware between TX and RX modes. When TX mode is displayed, the spectrum display is replaces with the TX WPM display. This also enables the tuning knob to be used to adjust the WPM value. In TX mode, pressing the Esc key will toggle the transmit side tone generator and the side tone display on and off. When the side tone is on, the side tone frequency can be changed as described above in the Setup section.
Once TX mode is enabled, all keyed characters will be displayed on the LCD display but only valid Morse characters will be transmitted. In CW mode, the keyboard is forced into Caps Lock state and all alpha characters will be entered as capital letters. Simultaneously pressing a Shift key will enter alpha characters as lower-case letters. Capital letters are transmitted normally, lower-case letters are transmitted without inter character spaces after them and are used to form prosigns (e.g., “bk” for BREAK).
Characters entered from the keyboard are displayed on the LCD display with over lines. The over lines are cleared when the character is transmitted. Morse characters are transmitted in words only. A series of characters will only be transmitted after a following space character has been entered. Limited editing of input is possible on words that still have the over line displayed (no trailing space). Editing is limited to using the Backspace key and rekeying the text.
All the normal hot keys for entering canned strings (e.g., My Call) are available in CW mode plus Alt-S and Alt-T which enter the current serial number. Similarly, all the standard hot keys for entering special codes in macros are available in CW mode plus Alt-X and Alt-S insert the serial number tag into the macro text. Tags are replaced with the current corresponding value/text when the macro is played.
CW Direct Mode ... Allows your modem to key any CW rig!
A new mode introduced in the NUE-PSK modem "version 5" software update is called CW Direct, which allows your modem to connect to any transceiver in order to send and receive in CW Mode. No longer is an SSB transceiver required for CW Mode use!
Using the “CW Direct” mode, the PTT line of the
modem will key the Keyline of your rig, usually where your straight key plugs
in. Or if you only have a paddle input for use with a built-in keyer, just
determine how to set the rig to “straight key” mode.
Note that in Version 5.0 the actual keying of the rig is delayed so that, like
keyboard CW, only full words are transmitted. This means you cannot use the
rig's CW side tone to monitor your keyer, you must use the modem's keyer
sidetone. Version 5.1 keys the rig directly from the keyer output so you can use
the rig's CW side tone to monitor the keyer. Version 5.1 also allows you to turn
off the modem's CW side tone and use the rig's audio output for both Tx and Rx.
Version 5.1 is in final testing and should be released soon.
Many transceivers can be configured to use a
common PTT line between the digital interface connector and the key input.
Unfortunately, the Cube is not (yet) one of them. To use the Cube in CW Direct
mode, you will need to make a special cable with the PTT line in the digital
interface brought out to the tip connection on a 3.5 mm stereo connector that
can be plugged into the Paddle jack in the cube. You will then have to go into
the menu and set the Cube's keyer type to "Manual" (straight key). A second 3.5
mm stereo connector will have to be connected to the audio in line in the cable
and plugged into the Phones jack in the cube. It is not necessary to connect the
audio out line to anything since that signal is not used in CW Direct mode. This
is described along with a schematic in Section 7.2 of the Keyer Manual posted on
the NUE-PSK web site.
In order to listen to the Cube audio at the same time, use an audio splitter
cable that connects two female jacks to one male plug. Plug your ear phones into
one jack and the modem cable audio in jack into the other.
Instead of making a new cable, you could open the insulation on your standard
cable near the cube end, find the PTT and ground wires and splice the stereo
connector in with enough wire length to allow it to be plugged into Paddle jack
while the the standard cable connector is plugged into the NUE-PSK connector.
Many rigs will allow CW keying from the PTT line in the digital interface. Check
your rig's user manual. Some, like the Yaesu FT2000, have a menu setting to
enable this keying mode. In this case you must operate the rig in CW mode not
digital or packet mode.
![]()
![]()
Page last updated: August 8 2012